Debugging attiny85 code, part 1: simavr and gdb
In a case of awful timing, after my recent project involving some attiny85 programming I finally got around to learning how to use simavr and gdb to help debug my AVR code. It was too late for me (and I will never get the time back that I spent debugging things with an LED and lots of re-flashing), but maybe this will help someone else!
I’ve split this into three posts:
A walkthrough of using GDB to manually inspect the behavior of our code.
Part 2: Automating GDB with scripts
Creating GDB scripts to automatically test the behavior of our code.
Using
simavrto collect information about the state of microcontroller pins while our code is running.
This is part 1.
Prerequisites#
In these posts, I will be referencing the code from my pipower project that I discussed in an earlier post. If you want to follow along, start by cloning that repository:
git clone https://github.com/larsks/pipower
You’ll also want to be familiar with the attiny85 or a similar AVR microcontroller, since I’ll be referring to register names (like PORTB) without additional explanation.
Goals#
In this walkthrough I won’t be attempting to fix a bug, so perhaps the term “debugging” is, if not a misnomer, than at least only broadly applied. Rather, I am attempting to verify that my code behaves as expected in response to various inputs to the microcontroller pins.
Pipower is implemented as a simple state machine. In each operational state, changes to input pins or timer expirations can cause it to transition into another state. The complete set of states look like this:
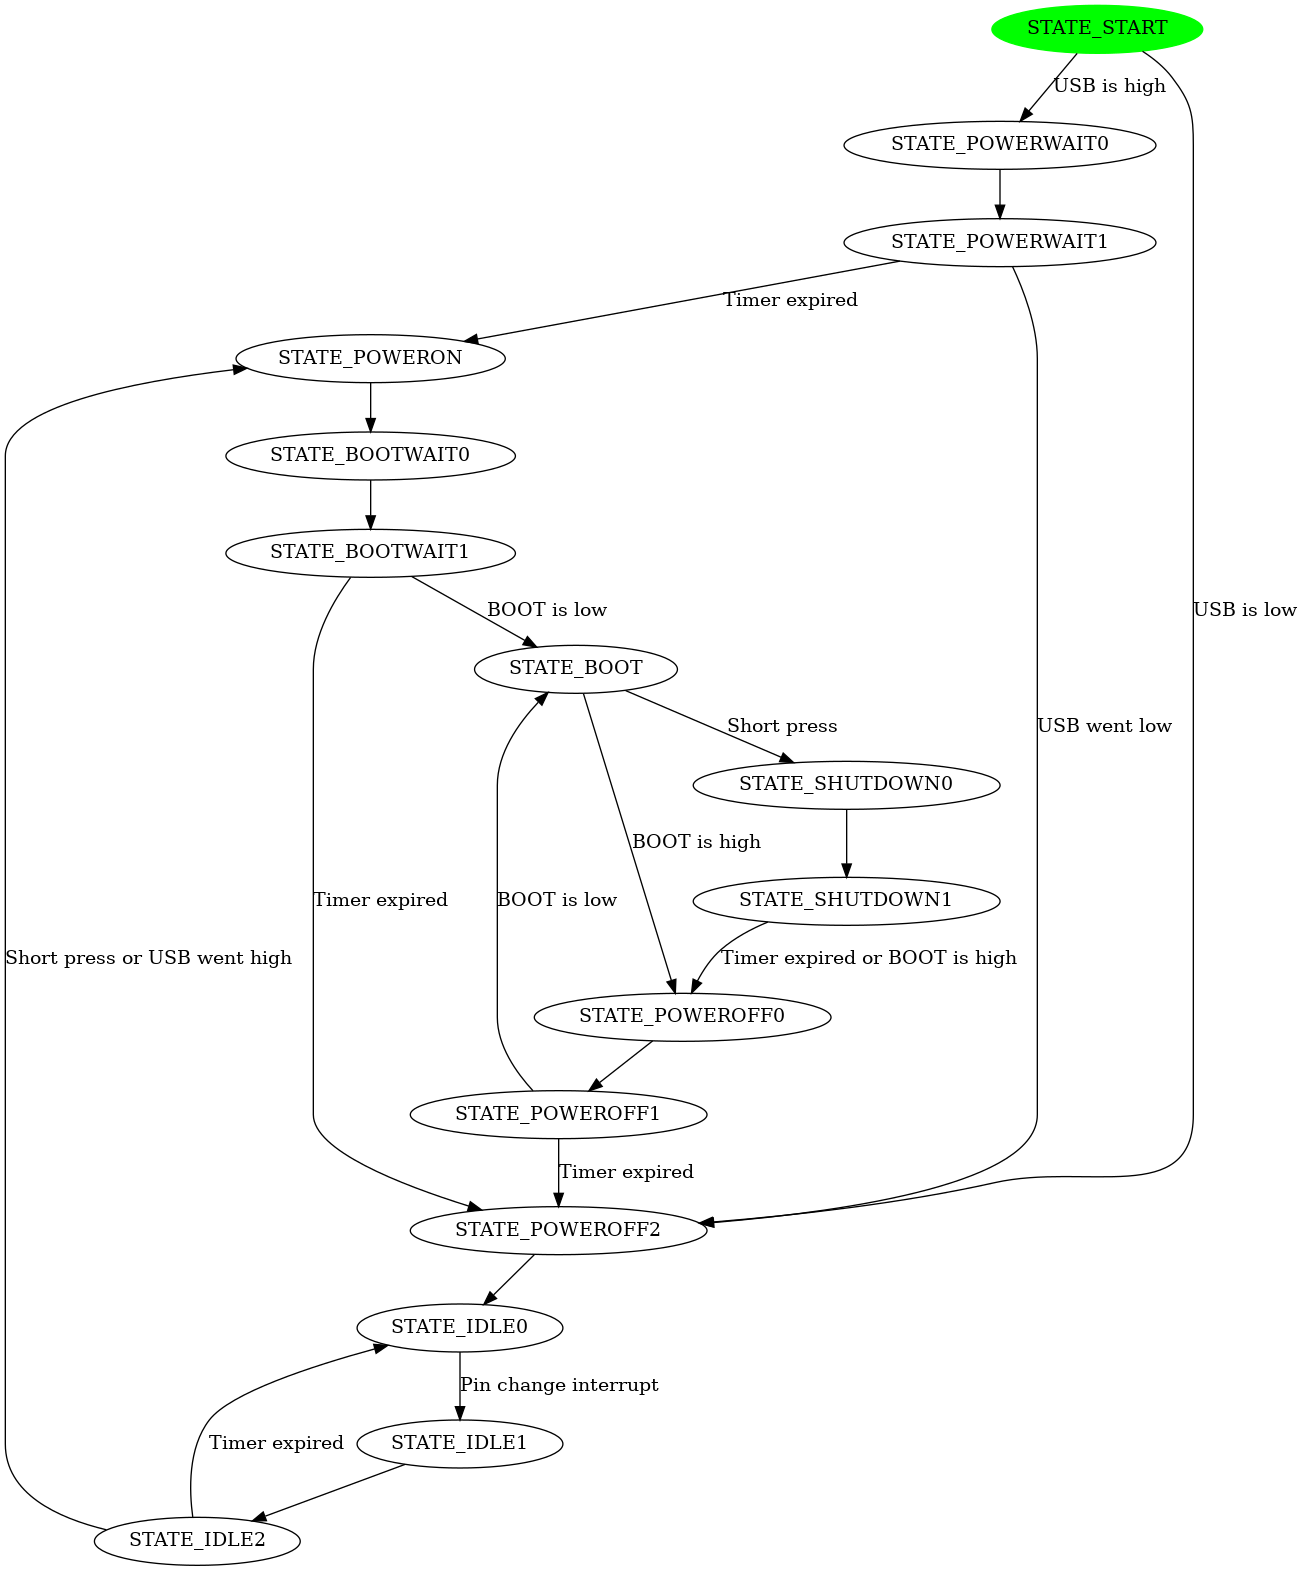
PiPower state diagram
We’re going to walk through a particular set of state transitions.
Getting started#
Before we start debugging, we should make sure that the code is built with debugging symbols and without optimizations. If you cd into the sim directory of the pipower project and run make, that’s exactly what you’ll get.
$ cd sim
$ make
[...]
avr-gcc -I.. -DTIMER_BOOTWAIT=1000 -DTIMER_SHUTDOWN=1000 -DTIMER_POWEROFF=1000 -Wall -g -Og -DF_CPU=1000000 -mmcu=attiny85 -c ../pipower.c -o pipower.o
[...]
There are several things happening here:
The
Makefilein this directory setsVPATH=.., which meansmakewill look in the parent directory to find our sources. We need to tell the compiler to also look for include files in that directory; we do that with-I...A caveat to the above is that
makewill also look in..for object files to determine whether or not they need to be rebuilt. If you have previously builtpipowerfrom the project root directory, you’ll want to run amake cleanin that directory first.We’re enabling debug symbols (with
-g) and disabling most optimizations with-Og. From thegccmanual:-Ogshould be the optimization level of choice for the standard edit-compile-debug cycle, offering a reasonable level of optimization while maintaining fast compilation and a good debugging experience. It is a better choice than-O0for producing debuggable code because some compiler passes that collect debug information are disabled at-O0.We are redefining several timers to be much shorter so that we don’t have to wait around when debugging (
-DTIMER_BOOTWAIT=1000, etc).
Start simavr#
We need to start simavr before we can attach to it with gdb. We’ll need to provide it with a path to our compiled pipower.elf file, and we also want to make sure that we provide a clock frequency that matches the value of F_CPU we used when building our code (1000000):
$ simavr -m attiny85 -f 1000000 pipower.elf -g
The -g flag instructs simavr to wait for a debugger connection before it starts to execute the code.
Connect with gdb#
Now that simavr is running, we start up avr-gdb:
$ avr-gdb
GNU gdb (GDB) 8.1
[...]
Load our binary:
(gdb) file pipower.elf
Reading symbols from pipower.elf...done.
Attach to the simulator (by default, simavr listens on port 1234):
(gdb) target remote :1234
Remote debugging using :1234
0x00000000 in __vectors ()
And load the code into the simulator:
(gdb) load
Loading section .text, size 0xa42 lma 0x0
Loading section .data, size 0x6 lma 0xa42
Start address 0x0, load size 2632
Transfer rate: 2570 KB/sec, 175 bytes/write.
Run the code#
At this point, our main() function has not started executing. Before we start the code, let’s set a breakpoint in the loop() function:
(gdb) b loop
Breakpoint 1 at 0xaa: file pipower.c, line 98.
With this in place, when we start executing our code via the continue command…
(gdb) c
Continuing.
…execution will stop as soon as it reaches the top of the loop() function:
Breakpoint 1, loop () at pipower.c:98
98	    now = millis();
While debugging this code, I find it helpful to have the current state of the attiny85 pins displayed whenever we hit a breakpoint, as well as the current value of the state variable. The following commands will display the current state and the binary contents of the PORTB and PINB registers:
(gdb) display state
(gdb) display /t PORTB
(gdb) display /t PINB
Pin assignments used in this project as as follows:
| Pin | Name | I/O | Description |
|---|---|---|---|
| 0 | POWER | I | Connected to active-low power button |
| 1 | USB | I | USB signal from powerboost |
| 2 | EN | O | EN signal to powerboost (turns on power) |
| 3 | SHUTDOWN | O | Signal to Pi requesting shutdown |
| 4 | BOOT | I | Signal from Pi that it has booted |
We can see the initial value of everything by running the display command without any arguments:
(gdb) display
1: state = STATE_START
2: /t PORTB = 10001
3: /t PINB = 10001
Since this is the first iteration of the loop, we’re in state STATE_START. Looking at PINB, we can see that the USB signal (pin 1) is low, indicating that external power is not connected.
Let’s run the loop for a few iterations:
(gdb) c 10
Will ignore next 9 crossings of breakpoint 1.  Continuing.

Breakpoint 1, loop () at pipower.c:98
98	    now = millis();
1: state = STATE_IDLE2
2: /t PORTB = 10001
3: /t PINB = 10001
(gdb)
Since there was no external power available (PIN_USB is low), the code has entered the STATE_IDLE2 state, as expected. Let’s see what happens when power becomes available. We start by setting PIN_USB high:
(gdb) set PINB = PINB | 1<<PIN_USB
And then run the loop a few times:
(gdb) c 100
Will ignore next 99 crossings of breakpoint 1.  Continuing.

Breakpoint 1, loop () at pipower.c:98
98	    now = millis();
1: state = STATE_BOOTWAIT1
2: /t PORTB = 10101
3: /t PINB = 10111
The code has entered STATE_BOOTWAIT1, which means it is waiting for an attached Raspberry Pi to set PIN_BOOT low. You can also see the PIN_EN has been set high, which instructs the power supply to provide power to the Pi.
In practice, an attached Raspberry Pi would set PIN_BOOT high to signal that it had successfully booted. Let’s simulate that here and run the loop for a few more iterations:
(gdb) set PINB = PINB & ~(1<<PIN_BOOT)
(gdb) c 100
Will ignore next 99 crossings of breakpoint 1.  Continuing.

Breakpoint 1, loop () at pipower.c:98
98	    now = millis();
1: state = STATE_BOOT
2: /t PORTB = 10101
3: /t PINB = 111
This brings us to the STATE_BOOT state, which means that our Pi has successfully booted. At this point, a button press should trigger the shutdown sequence. Let’s see if that actually works! We will simulate a button press by first setting PIN_POWER low, running the loop a few times, and then setting it high:
(gdb) set PINB = PINB & ~(1<<PIN_POWER)
(gdb) c 100
[...]
(gdb) set PINB = PINB | 1<<PIN_POWER
(gdb) c 100
Will ignore next 99 crossings of breakpoint 1.  Continuing.

Breakpoint 1, loop () at pipower.c:98
98	    now = millis();
1: state = STATE_SHUTDOWN1
2: /t PORTB = 11101
3: /t PINB = 1111
The code recognized and responded to the button press, and is now in state STATE_SHUTDOWN1, waiting for the Pi to set PIN_BOOT high. We can raise PIN_BOOT:
(gdb) set PINB = PINB | 1<<PIN_BOOT
(gdb) c 100
Will ignore next 99 crossings of breakpoint 1.  Continuing.

Breakpoint 1, loop () at pipower.c:98
98	    now = millis();
1: state = STATE_POWEROFF1
2: /t PORTB = 10101
3: /t PINB = 10111
This brings us to STATE_POWEROFF1, during which the controller will wait some amount of time before cutting power to the Pi. Our debug build has reduced this timer to 1 second, but if you don’t have time for that we can simply run until the next state transition like this:
(gdb) disable 1
(gdb) tb loop if state != STATE_POWEROFF1
Note: breakpoint 1 (disabled) also set at pc 0xaa.
Temporary breakpoint 2 at 0xaa: file ../pipower.c, line 98.
(gdb) c
Continuing.

Temporary breakpoint 2, loop () at ../pipower.c:98
115         now = millis();
1: state = STATE_POWEROFF2
(gdb) enable1
(gdb)
This works by disabling the unqualified breakpoint at the top of loop() and creating a new temporary breakpoint (meaning it will be removed once it triggers) that will only trigger when the global state value has changed.
From STATE_POWEROFF2, Pipower will enter the various IDLE* stages, during which it enters a very low power sleep mode.
That’s it for the walk-through! Hopefully that has given you some idea of how you can use simavr and a debugger to test your AVR code without having to flash it to a device first.